How to make a DIY Throw Pillow [easy no-sew pillows for cheap in 15 minutes]
Do you love to decorate your home, but don’t have the budget for an Anthropology mirror or a West Elm ottoman? Or maybe you like decorating for the different seasons or just like the freedom to switch up your style without breaking the bank? Well, this is the perfect DIY for you! This DIY cost me around $12 in supplies (most of which I already had at home) and took about 15 minutes to complete. It is super easy and allows you to make a bunch of fun pillows for your couches, chairs, or bed without having to spend a lot of money shopping or time sewing your own.
Materials to Make a DIY Pillow
Fabric Placemat (double layered)
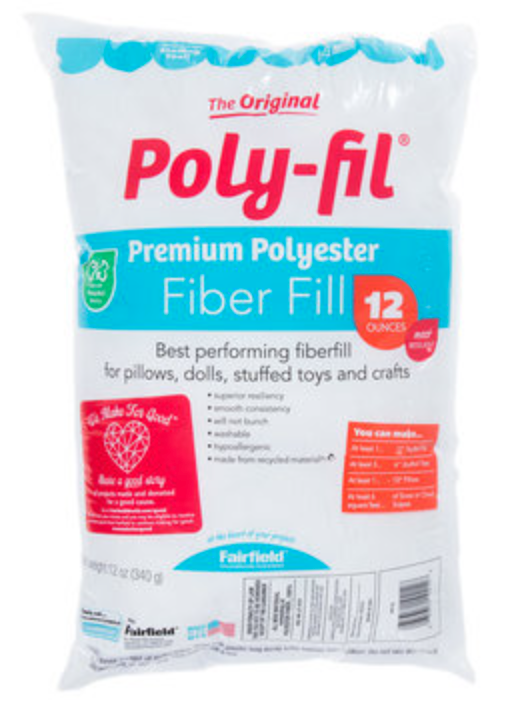
Poly-fil
Scissors
Hot glue/ needle and thread
In order to make this DIY throw pillow you need to gather some supplies. Most of these can be found at your local craft store or Walmart/Target which makes it easy so you don’t have to drive all around town hunting for supplies. All of these supplies are also relatively cheap and you could possibly have everything that you need in your home.
First and most important, you are going to need a fabric placemat. Yes, you read that right, a placemat! It is the secret to this whole project because it is already in the shape of a pillow so it makes it super easy for you to make your own. You can find really pretty ones at Target or seasonal ones at Hobby Lobby or perhaps Walmart. However, the trick is that you need a placemat with two layers of fabric, you need this so you can stuff the pillow and not have to sew a mack piece on yourself. You can tell if it is two pieces of fabric by holding it flat between your hands and then pinching each side. If there are two pieces then it will pull out kind of like a pillowcase. It can be any kind of fabric or pattern you like. However, plain cotton will be the easiest to work with and might be the best to start out with. Then once you’ve gotten the hang of it you can move to more fun fabrics.
Next, you’ll need some poly-fil or some other material you want to use to stuff your pillow. You can usually find poly-fil at Walmart in the craft section or any craft store. Depending on the size, stiffness of the fabric, and how stiff you want the pillow to be you can also use scrap pieces of fabric if you want to reuse materials from other DIYs.
Next, you’ll need some scissors. They don’t have to be anything fancy just sharp enough to cut. Lastly, you’ll need either a needle and thread or a hot glue gun if you don’t want to sew. You can also use super glue but it is a little harder to get the opening to stay closed unless you have something to clamp it down.

Making the DIY Throw Pillow
First, you will want to take the tags off of the placemat and then iron out any wrinkles (it is easier to iron it before you stuff it). At this point, you can also wash it if you want to. Then at one of the corners, I would suggest the bottom corner on the backside of how you want the pillow to face, cut a small slit about two inches long. It just needs to be big enough that you can stuff the poly-fil into the pillow. I would cut it small first and then if you want to cut it bigger as you stuff you can, just remember that it will probably stretch out some depending on the fabric as you stuff it. Also, make sure that when you cut the hole you are only cutting through one layer of fabric. When you are stuffing the pillow you can use a chopstick or the handle of a long spoon to push the poly-fil into the corners if you can’t reach it with your fingers. This is something that you don’t think of, but can make a huge difference in the finished product. Your pillow can look kind of frumpy if the corners are saggy. See the pictures below for some more detail.


Once you are happy with the amount of stuffing in your DIY pillow, it is time to close the hole. You can do this in a couple of different ways.
You can sew it closed if you want. This way ends up with the softest pillow because it is all just fabric and string whereas the other ways have hard glue.
The fastest way is to use hot glue to close the hole. You can put a small line on the bottom of the cut and fold the top of the cut inwards and then press it to the glue so that you hide the cut edge. Obviously, be careful and don’t burn yourself! If you are young don’t be afraid to ask for help from an adult.
Lastly, you can also use fabric glue or super glue. You would apply it the same but make sure that you have something to hold the two sides of the cut together while it dries. These last two options with the glue can leave a harder seam where the glue dried so you might want to be aware of this if you are wanting a very soft pillow.
I sewed mine because I did not have any glue at the time but you can do whichever technique you are most comfortable with. Another way to do this is to use a seam ripper and rip a section on the bottom seam of the pillow and resew it if you want a cleaner look. However, I never really notice the little stitching since it is on the backside of the pillow.


Finishing
That’s about it! You can take a minute to squish around your pillow and help the poly-fil settle into a shape you like. I have one of these DIY pillows on my couch all of the time. I just get different placemats to switch out for different seasons and holidays since they are so easy to make. Also, as you might have noticed from my pictures this placemat had two different sides so I can switch it whether I want. I think this is a really easy and fun way to spruce up your couch or bedding, plus it adds a personal touch because it was made by you!

I am Lexi, the creator of S and L Handmade. After years of searching for a way to make my own stuffed animals, I discovered the art of crocheting and fell in love! Now, I get the joy of creating quality crochet animals for others to take on adventures and cuddle. I pray that everything I make lasts through the good and the bad and reminds you how wonderful you were made.