6 Tips for Crocheting
Now that you have learned some of the basics of crocheting you have probably started getting the hang of things. However, there are times when everything seems to be going great and then one stitch later everything is wrong. I know exactly how you feel. You watch the same video clip ten times staring at their hands, yet you can’t figure out what you did differently. In this blog, I will address some of the simple mistakes that I made (and still make) and how to fix them or create a new habit to help with them.
6 Tips to Get Better at Crocheting
Learn the Difference between Yarn Over and Yarn Under
Use a Stitch Marker'
Learn the difference between US and UK terms
Find the correct tension
Note what size hook you used
No such thing as the Crochet Police
There is a difference between Yarn Over and Yarn Under
Yes, there is a difference between the two. Mainly, the tension of your stitches and how they look. Yarn over is used as a little bit looser stitch and for more everyday items. On the other hand, yarn under is used for amigurumi because it is a little tighter and cleaner. It can be really difficult to tell the difference and even harder to actually do them both, but don’t worry I have a video below that I think explains them both very well.
This YouTube video is from Forever Bliss Crochet
Here is a picture that shows you the difference between yarn over (YO) and yarn under (YU)
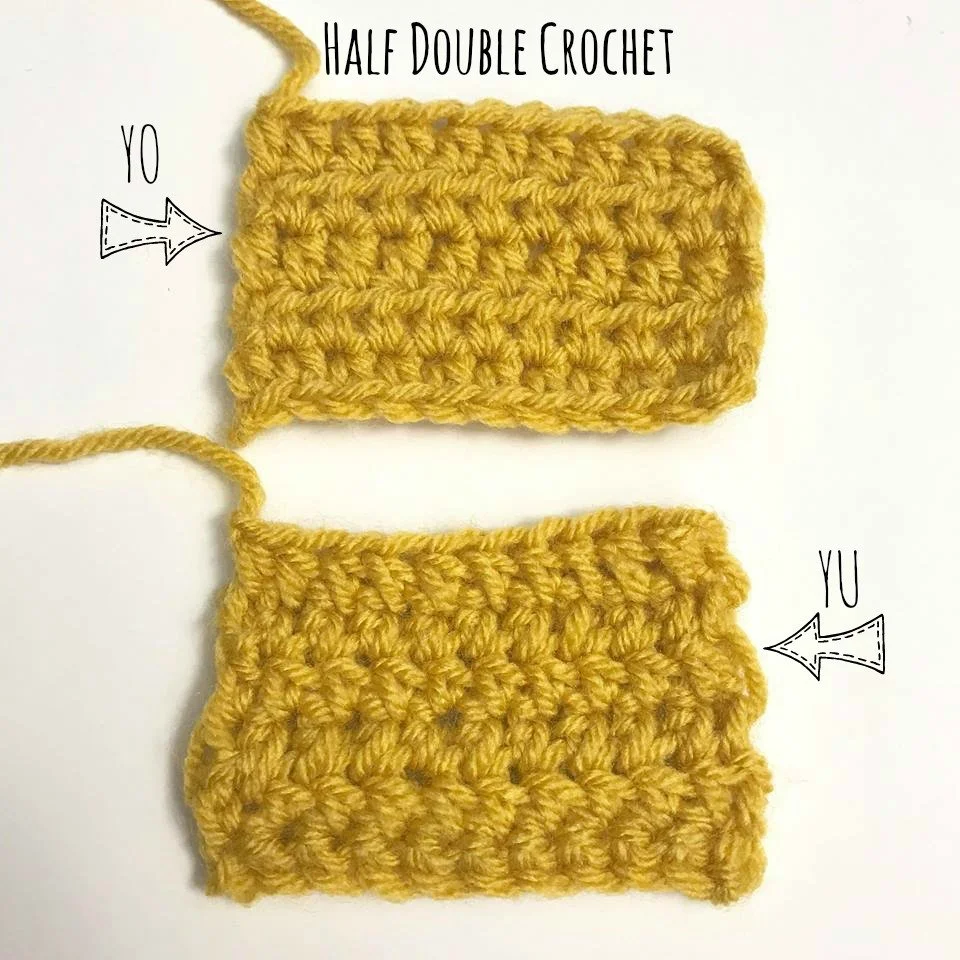
Image from Blackstone Designs
2. Use a stitch marker
These little plastic pieces can seem really inconvenient when you first start out. I remember thinking “I can count, why do I need this?” and “I could do this so much faster if I didn’t have to keep moving this”. However, don’t fall into these traps, because as soon as you do you’ll get in the groove and realize you haven’t been counting the last three rows. Then you will have to figure out where you are and maybe even frog (undo) a large portion of your project. You’ll get used to using a marker and be able to take them out quickly. After a lot of practice you might be able to not use one, but I highly suggest if you won’t have 100% focus on your project that you use one.
3. Is it in UK or US crochet?
I cannot tell you how many times I was working through a pattern and thinking to myself “this doesn’t look right” just to realize it was written in a different version. As I mentioned in my last blog. There is a UK crochet and a US crochet; they are different by one stitch size, meaning: a US single crochet (SC) is a UK double crochet (DC). So if your project is looking too big or too small double check which version it is written in and that could solve your problem. There is usually something about this is the notes section of patterns.
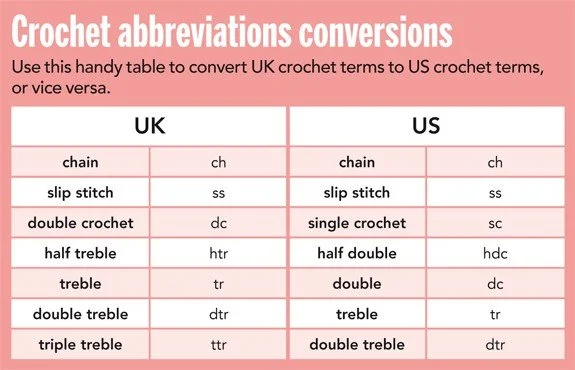
Image is from Gathered.
4. Play with tension
When you are first learning how to crochet tension can be really tricky. The hook just feels awkward in one hand and the other is all tangled up in yarn. You make some stitches really tight and try to loosen it then all of the sudden they are way too loose. Patience is key! It takes time for the actions to feel right and to know what it is supposed to feel like versus what it isn’t. Just keep crocheting as well as be aware of how tight (or not tight) you are holding the yarn and hook.
Here is a great beginner video that can help you get a better idea of tension (for tension specifically, skip to 6 minutes)
Video is from Bella Coco
5. Note the hook you used
One of the worst feelings is getting ready to continue working on a project that you have spent so much time on just to realize you don’t remember what size hook you used. You can play the roulette of picking a hook and seeing if the stitches come out the same, but rarely does that work.
A simple way to skip this unpleasant situation is to note which hook you used. I have seen several ways to do this. First, you can make a physical note and keep the piece of paper tucked away with your project. Second, you can take a picture of your hook with your project (this is what I do). Third, I have also seen people find beads with the either the number or letter of your hook on them and thread them onto you stitch marker. Lastly, I have seen people tie knots that correspond with the number on the hook (4 knots for a 4mm hook)

Find these on Amazon
6. “There is no such thing as the Crochet Police”
I wanted to leave you with this tip because it is arguably the most important. There are no crochet police that are going to come and take your hooks away because you aren’t holding them right. There is no one right way to crochet. Everyone holds their hooks, yarn, and projects a little differently and that is okay! I recommend watching a lot of different videos from different creators to see if there is a style that feels best to you!
I found this saying on Instagram by The Crochet Project and I love it because it is so true. Give yourself some slack! Crochet artists weren’t made in a day and neither were the majority of the bloggers, Instagramers, and YouTubers that you are watching. You have to spend a significant amount of time practicing before it is just muscle memory. Yes, you will make mistakes, but KEEP PRACTICING it will be so worth it in the future!

Remember, do it for you and not to be seen by others. You can do it!
Blessings,